Katie’s Sweet Corn Bread

I have never really been a fan of corn bread. Growing up I didn’t get what the big deal was about cornbread. It was ok, but not wonderful.

Until I met this Corn Bread

and I feel deeply, deeply in love.

I got this recipe from my good friend Katie, she has a blog, but it is private. So I am taking it upon myself to share this wonderful recipe (I hope it isn’t a family secret…).

It is seriously the best stuff, it will change your life, make your kids behave and your husband pick up his socks.

Yes, it is that good!

Here is our cast of characters:

1 cup cornmeal
2 cup flour
1 Tbsp baking powder
1/2 tsp salt
1 1/2 cup sugar
3/4 cup melted butter
4 eggs
1 cup milk
1 tsp vanilla


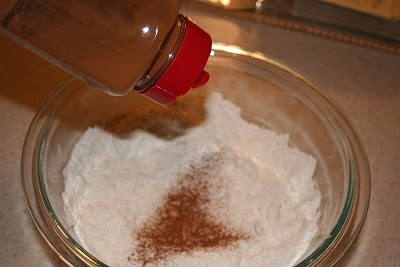
Mix all the dry ingredients, and give them a stir in the bowl.


Melt the butter and mix it with the wet ingredients.
Whisk it well.

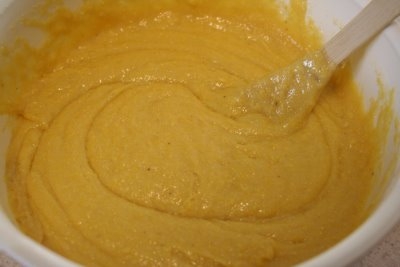
Pour the wet into the dry


and stir it well

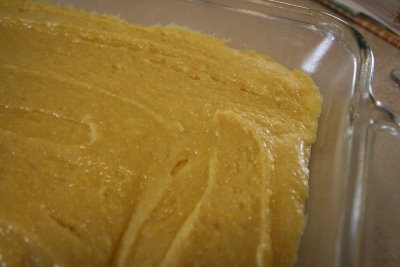
Pour it into a greased 9×13 pan

Bake at 350 degrees for 30 to 40 minutes.

Check for doness (is that a word?) by sticking it with a fork or toothpick, it will come out clean if it is fully cooked.

Serve hot with butter and honey….good enough to be a dessert.


If I am feeling particularly frugal I will freeze half of it. It freezes really well.

You can also make muffins, this batter will make 24 muffins. I keep them in the freezer and put them in lunches or use them for after school snacks.

Biscuits

This recipe is so good! All the ingredients can come off your pantry shelf which makes for a perfect food storage recipe. With a total time of 30 minutes from start to finish it makes for a quick side bread to any meal. Best of all it is yummy, flakey, buttery, biscuity goodness!

Here is our cast of characters:
4 cups flour
2 Tablespoons Baking Powder
2 teaspoons salt
2/3 cup shortening
1 1/3 cup milk, or buttermilk or yogurt
(simple huh!)

To the flour you add all your dry ingredients. You can also use wheat flour if you want to, but I think the white makes a lighter biscuit, and anyway, this isn’t a healthy, fat free type of item, why mess with that and use whole wheat?

Stir the dry ingredients together with a fork

Then add the shortening.

Cut in the shortening with a pastry blender. If you don’t have one (I don’t, I really, really, want one, but I can’t find on anywhere. If any of you happen to see one, pick it up fo me, I will pay you back) Or if you don’t have one (me, me) use two butter knives.


You want the shortening to blend in, but do not mix it in well, I need to be in little clumps. That is what makes it flakey.

Add your milk, (powder milk if you are using food storage) or buttermilk, or yogurt. If you don’t have buttermilk on hand and would like the flavor of a “buttermilk buscuit” Add 1 Tablespoon vinegar or lemon juice to the milk before you add it.

Stir it all up with a fork and dump it out onto a lightly floured work surface.

Taking care not to mix in the shortening too much; with your hands moosh (is that a word? moosh) it into a ball

Roll it out until you get it to your desired thickness. I like it to be about 2 inches thick, the thicker the dough, the thicker your biscuit

Now cut out your buscuit. If you would like to be a fun mom/wife/girlfriend/person, use fun cookie cutters.

If you don’t care and just want to get the job done, use a cup, like Punk #1 is doing.

Stick them all on a cookie sheet that has been lightly sprayed with cooking spray, or greased with shortening. You can put the biscuits really close together, they won’t spread out, they will raise up.

Bake at 425 degrees for 10 t0 15 minutes, until golden brown.

Now doesn’t that look yummy. Wonderful, flakey, down-home goodness.

Drizzel with honey, jam, apple butter……..and sink your teeth into warm biscuit heaven.

If I am doing this recipe for breakfast (it is yummy with eggs and sausage and if I really want to throw caution to the wind, I will even make gravy, but only sometimes, well, I think I have only done that once…) I will mix everything but the milk the night before and stick it in the fridge.

In a couple of days I will post the recipe for homemake pancakes, they are as quick and easy as buying a mix and much better for you!

Old English Scones

I always thought that scones were a type of deep fried bread. Around here that is what people typically think of when someone says “scones”. Actually scones are a type of flakey baked bread, a lot like a big biscuit. English scones are served mostly with tea or coffee, and since I usually don’t partake of coffee or tea we eat it with milk for breakfast. This is a great food storage recipe. Your kidlets and husband will like it, it is easy to modify to suit the taste of your family, and it can be used for dinner, snacks or breakfast. So here goes!


Here are our ingredients:
2 cups flour (white or wheat)
1/4 cup sugar
1 Tbsp Baking powder
1/2 tsp salt
1/3 cup shortening
1 egg
1/2 cup milk

The only thing that can’t come out of your food storage is the egg, unless of course keeping chickens in your backyard is part of your plan. If you don’t have an egg, just use a little more milk. You can also use buttermilk or yogurt in place of the milk.

First you mix all the dry ingredients


Then add shortening

Then you “cut” the shortening in, using a pastry cutter, or two butter knives or a fork. You don’t want the shortening to mix into the dry ingredients, it needs to look like a bunch of flour and pea sized clumps of shortening.

If I am making this for breakfast I will mix everything up to this point the night before then cover it in plastic wrap and put it in the fridge. You don’t have to do this step and it will still be yummy!

Here we are the next morning just coming out of the fridge. (Yawn)

(I forgot to add the cinnamon the night before, I like to add cinnamon, I think I am discovering that cinnamon is my favorite spice)

add your egg

and milk, or buttermilk, or yogurt…..

Mix it all up until it is a crumbly mess. Don’t mix it up until it is all combined well, that is what makes it flakey and crispy

With your hands moosh it into a ball

Put it on your pan (or stone, I like useing a baking stone for this) and with your fingers spread it out to about a inch thick, using a pizza cutter make 8 wedges.

sprinkle it with cinnamon and sugar, or sugar, or chocolate chips, or colored sprinkles….whatever

Bake at 425 degrees for 15 minutes until it is golden crispy

I serve it with apple butter (this stuff is to die for! Thanks Katie for talking me through making my apple butter)

Yummy, yummy, yummy!!!!

This recipee is really easy to modify! If you want to use it for dinner don’t put any sugar in it and it is like a biscuit. Or (one of my favorite ways) you can add fruit. I like blueberries. When you add fruit double the sugar, and add frozen or fresh fruit when you add the wet ingredients. I like it with cinnamon and chopped apples. You could add chocolate chips or nuts too. Serve it with jam, apple sauce, cold milk, hot chocolate, diet coke, tea or coffee ( if that is what moves you).

(if I am serving this as breakfast I am learning that I need to double the recipe for my family of 7, or serve something with it, fresh fruit, scrambled eggs or sausage)

Bread Recipe

As requested, here is my bread recipe. I have made this with all whole wheat flour, it is a really heavy bread, I prefer it half and half. I have also learned that when using whole wheat flour you can’t neglect the kneading, you need to work with it until the dough is smooth or the gluten won’t develop properly.


Half and Half Wheat Bread

2 ½ cup warm (115 degree) water
1 Tbsp active dry yeast
¼ cup honey
3 Cup whole wheat flour
1 Tbsp salt
¼ cup butter
3-4 cups white flour

1-pour water into small mixing bowl
2-Sprinkle in yeast and add honey. Let yeast dissolve without stirring. Yeast will form a tan coating over the water in 5 to 10 minutes. Don’t let it stand so long it becomes light and foamy; it will lose its life.
3-While yeast is dissolving, sift together 3 cups whole wheat flour and salt in to large mixing bowl (I use my mixer) Add butter to flour and salt and cut in.
4-Add yeast mixture to four mixture. Beat well to make a sponge. Cover with plastic wrap or damp towel and let stand 10- 15 minutes.
5-Gradually add white flour to the sponge, never exceeding the lower measurement of 3 cups, adding only enough to make soft dough.
5-Turn onto well floured surface and knead 8-10 minutes, adding flour only as necessary to prevent sticking.
6-Return dough to bowl and cover with plastic wrap or damp towel. Let rise one hour in warm place or until double in bulk.
8-Punch down and divide into 2 portions
9-Shape in to loaves and put in greased loaf pans. Let rise.
10-For superior texture, punch down, reform loaves and let rise a second time.
11-When dough is almost double in bulk bake 30 minutes at 400 degrees, or until done.
12-Remove from pans and let cool on wire rack.

This also makes wonderful light white bread, just use white flour throughout the recipe.

Baking of Bread

Around September of this year I started to bake bread. I bake all of our bread, mostly. Over the Christmas Holiday I didn’t have two seconds to devote to baking. My extra time was spend washing clothes, dishes and babies bottoms. Today was the first day back to school for my older punks so I had some time to get back in to the swing of things. I did a big baking of bread. I baked 6 loaves of wheat bread. I figure when I bake it myself it costs about a dollar a loaf. For good whole wheat bread, that is a great price.
 
Usually I bake on Mondays and Tuesdays. I didn’t it today because I only had a half a loaf in my bread box, and I didn’t want to go out today to buy bread.

I love the satisfaction of baking my own bread.


And a steaming hot loaf of bread it only complete with a stick of soft butter.


OH YUM!!!


Yummy, Yum, Yum!!
Yummy melting butter

And I wonder why I have weight issues….


But most of all, I love slicing into a piping hot loaf, fresh out of the oven. You can’t see it in this picture, but there is actually steam coming from this loaf.